
The world of online payments is evolving faster than ever. In 2025, customers expect instant, secure, and flexible payment experiences. Stripe Integration enables developers and businesses to meet that demand effortlessly. Stripe, a global payment platform trusted by millions of brands, helps companies accept payments, manage subscriptions, and fight fraud through one unified API. From startups to tech giants, businesses use Stripe to simplify checkout and boost conversion rates. The reason it matters now more than ever is simple: digital transactions dominate global commerce.
Stripe’s integration ecosystem continues to expand with tools like Stripe Billing, Connect, and Elements, which make online payments easier and more customizable. In this guide, you’ll learn how Stripe Integration works, how to implement it step by step, and how to optimize it for both security and business success.
Quick Facts
| Feature | Description | Business Benefit |
|---|---|---|
| Stripe Connect | Handles multi-party payments | Perfect for marketplaces |
| Stripe Billing | Automates subscriptions & invoices | Boosts recurring revenue |
| Stripe Terminal | Accepts in-person card payments | Enables hybrid selling |
| Stripe Radar | AI-driven fraud prevention | Reduces chargebacks by 89% |
| Stripe Identity | Verifies user identity securely | Ensures compliance & trust |
The Evolution Of Online Payments
Online payments have shifted from simple card entries to dynamic, API-driven systems. Traditional gateways often lacked customization and developer support. Stripe changed that by creating a developer-friendly, flexible platform that connects directly with your website or app. By 2025, Stripe has integrated AI-based fraud protection and global currency support, making it one of the top solutions for scalable businesses.
How Stripe Became A Developer Favorite
Developers love Stripe because it focuses on simplicity. With detailed documentation, SDKs for every major language, and real-time dashboards, integration becomes quick and predictable. Its API supports webhooks, subscription billing, and advanced customization with minimal code. These features make Stripe ideal for SaaS products, e-commerce sites, and marketplaces.
What Is Stripe Integration?
Stripe Integration is the process of connecting your website, mobile app, or backend system with Stripe’s payment infrastructure. Once connected, you can securely collect payments, manage refunds, and track transactions in real time.
A Stripe integration can be:
- Basic (Checkout) – Redirect users to a pre-built, secure payment page.
- Custom (API Integration) – Create a fully tailored checkout within your website using Stripe Elements or SDKs.
Both methods ensure PCI compliance and data encryption, keeping sensitive customer information safe.
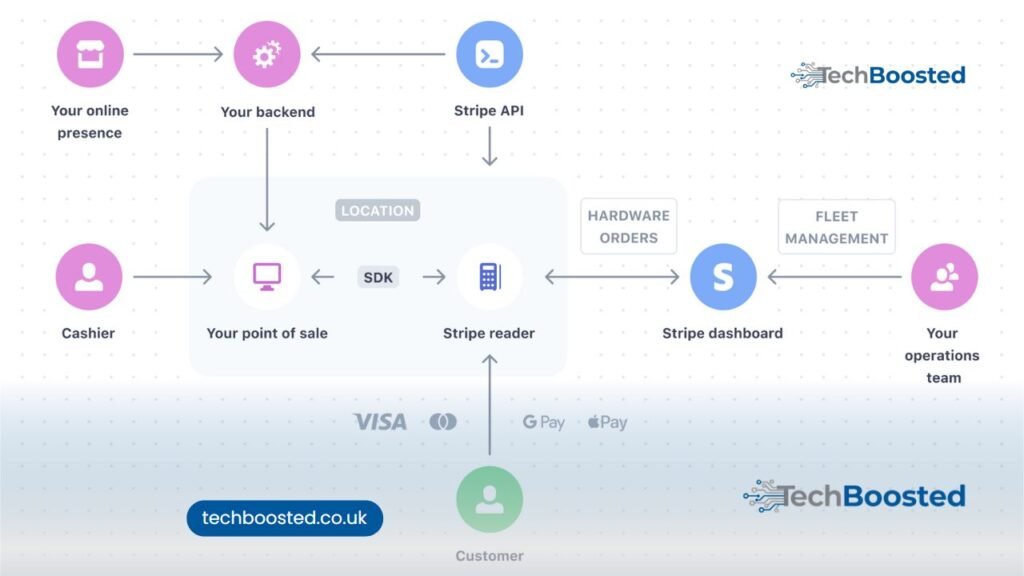
Understanding The Stripe Payment Gateway
A payment gateway acts as the bridge between customers, your website, and banks. Stripe processes payments by verifying card details, confirming funds, and depositing money into your account. Unlike older gateways, Stripe offers instant feedback through its dashboard and API, ensuring transparency and speed.
Key Features And Benefits For Businesses
- Global Coverage – Accept payments from over 135 currencies.
- Multiple Payment Methods – Credit/debit cards, Google Pay, Apple Pay, and even local wallets.
- Built-In Fraud Protection – Stripe Radar uses AI to detect suspicious transactions.
- Subscription Billing – Automate recurring payments easily.
- Developer Tools – Extensive SDKs and libraries for integration in any stack.
Stripe Integration Use Cases Across Industries
| Industry | How Stripe Helps | Example |
|---|---|---|
| E-Commerce | Secure checkout & refunds | Shopify stores using Stripe Checkout |
| SaaS Platforms | Automate monthly billing | Notion, Slack, and similar tools |
| Marketplaces | Split payments between sellers | Airbnb or Fiverr-style apps |
| Education & Courses | Subscription-based e-learning | Online academies with recurring fees |
| Non-Profits | Accept global donations | Charity platforms using Stripe Connect |
Preparing For Stripe Integration
Before integrating Stripe, you must set up your environment properly. This ensures your payment system runs smoothly from day one.
Setting Up A Stripe Account
- Visit https://dashboard.stripe.com/register.
- Enter your business and banking details.
- Verify your email and activate live mode.
- Access your API Keys under “Developers → API Keys.”
A verified account is essential to move from test to live transactions.
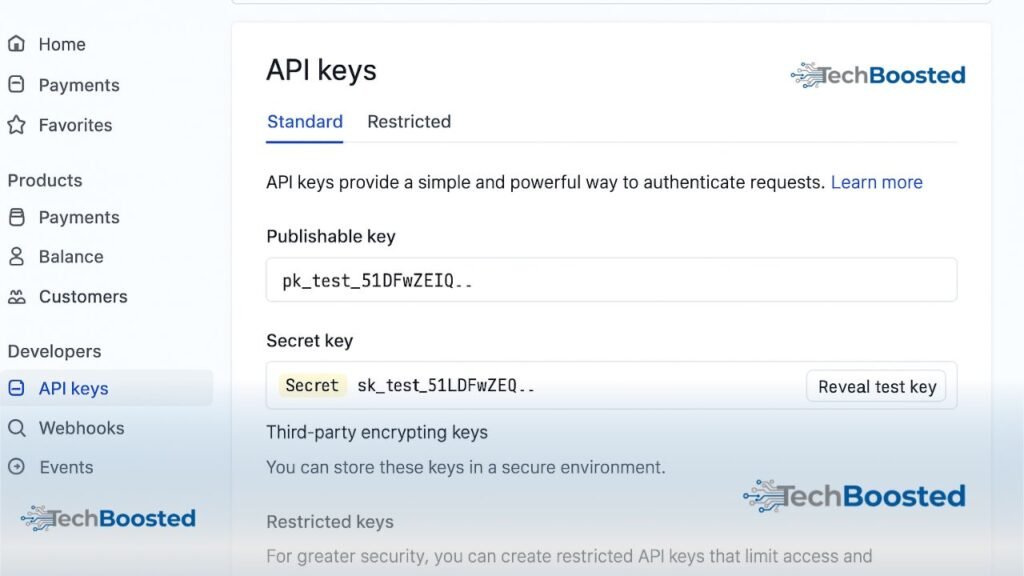
API Keys And Dashboard Overview
Stripe provides two key pairs:
- Publishable Key – Used on the client side for creating payment requests.
- Secret Key – Used on the server side for secure payment confirmations.
Always store your Secret Key in environment variables (e.g., .env file). Never expose it in frontend code.
The dashboard offers detailed logs, analytics, and refund controls — allowing complete transparency over every transaction.
Prerequisites For Developers (Languages, Frameworks, SDKs)
To integrate Stripe efficiently, ensure you have:
- Basic understanding of REST APIs
- A working server (Node.js, Python, PHP, Ruby or Java)
- An HTTPS-secured website
- Stripe’s official library installed (
stripe-node,stripe-python, etc.)
Example (Node.js):
npm install stripe
Then import and configure:
const Stripe = require('stripe');
const stripe = new Stripe(process.env.STRIPE_SECRET_KEY);
These steps create your base environment for seamless API communication.
Step-By-Step Stripe Integration Process
Integrating Stripe may seem complex at first, but following these clear steps makes it smooth and predictable.
Step 1 – Create A Stripe Account
Visit stripe.com. Click Start Now and fill in your business and banking details.
After verification, access the Stripe Dashboard, where you can switch between Test Mode and Live Mode for transactions.
Step 2 – Obtain Publishable And Secret API Keys
Navigate to Developers → API Keys in your dashboard.
You will find:
- Publishable Key: for client-side (frontend) payment forms.
- Secret Key: for server-side logic (charging and refunds).
Store the Secret Key in a secure environment variable. Example for Node.js:
export STRIPE_SECRET_KEY="sk_test_123456..."
Never expose this key publicly.
Step 3 – Install Stripe Library (Node.js, PHP, Or Python Example)
Node.js Example:
npm install stripe express body-parser
PHP Example (Composer):
composer require stripe/stripe-php
Python Example:
pip install stripe
These libraries provide access to Stripe’s REST API and simplify requests such as creating customers or processing payments.
Step 4 – Create A Checkout Session
A Checkout Session is Stripe’s simplest payment method.
It handles the heavy lifting security, compliance, and UI.
Node.js Backend Example:
const express = require('express');
const app = express();
const Stripe = require('stripe');
const stripe = new Stripe(process.env.STRIPE_SECRET_KEY);

app.post('/create-checkout-session', async (req, res) => {
  const session = await stripe.checkout.sessions.create({
    payment_method_types: ['card'],
    line_items: [{
      price_data: {
        currency: 'usd',
        product_data: { name: 'Premium Subscription' },
        unit_amount: 2000, // $20
      },
      quantity: 1,
    }],
    mode: 'payment',
    success_url: 'https://yourdomain.com/success',
    cancel_url: 'https://yourdomain.com/cancel',
  });
  res.json({ url: session.url });
});
On the client side, redirect users to session.url to complete the payment securely.
Step 5 – Test Transactions In Sandbox Mode
Use Stripe’s Test Mode and dummy cards to verify your integration.
Common test cards include:
| Card Number | Description |
|---|---|
| 4242 4242 4242 4242 | Successful payment |
| 4000 0000 0000 9995 | Payment requires authentication |
| 4000 0000 0000 0002 | Declined payment |
Testing ensures your system handles success, failure, and authentication flows correctly.
Step 6 – Move To Live Environment
Once testing succeeds:
- Switch from Test Keys to Live Keys in your dashboard.
- Update environment variables on your production server.
- Re-deploy your app.
Always re-verify webhook endpoints in production for security.
Real-World Example – Stripe Integration In React And Node.js
Backend Setup Using Stripe SDK
The backend (Node.js) manages secure payments. Here’s a minimal implementation:
// server.js
const express = require('express');
const Stripe = require('stripe');
const stripe = new Stripe(process.env.STRIPE_SECRET_KEY);
const app = express();

app.use(express.json());

app.post('/create-payment-intent', async (req, res) => {
  const paymentIntent = await stripe.paymentIntents.create({
    amount: 5000,
    currency: 'usd',
    automatic_payment_methods: { enabled: true },
  });
  res.send({ clientSecret: paymentIntent.client_secret });
});

app.listen(4242, () => console.log('Server running on port 4242'));
Frontend Integration With Stripe Elements
React Example:
npm install @stripe/react-stripe-js @stripe/stripe-js
// CheckoutForm.jsx
import {loadStripe} from "@stripe/stripe-js";
import {Elements, CardElement, useStripe, useElements} from "@stripe/react-stripe-js";

const stripePromise = loadStripe("pk_test_12345");

function CheckoutForm() {
  const stripe = useStripe();
  const elements = useElements();

  const handleSubmit = async (e) => {
    e.preventDefault();
    const {clientSecret} = await fetch("/create-payment-intent", {method: "POST"}).then(r => r.json());
    const result = await stripe.confirmCardPayment(clientSecret, {
      payment_method: {card: elements.getElement(CardElement)}
    });
    if (result.paymentIntent.status === "succeeded") alert("Payment successful!");
  };

  return (
    <form onSubmit={handleSubmit}>
      <CardElement />
      <button type="submit">Pay Now</button>
    </form>
  );
}

export default function App() {
  return (
    <Elements stripe={stripePromise}>
      <CheckoutForm />
    </Elements>
  );
}
This example demonstrates a secure, real-time integration using Stripe Elements for the frontend and Payment Intents API for the backend.
Testing And Error Handling Techniques
Always test for:
- Declined payments
- Authentication (3D Secure)
- Network issues
Implement error handlers in both backend and frontend to show meaningful messages to users.
Common Errors During Stripe Integration (And Fixes)
Invalid API Keys
Issue: API keys not configured or using test keys in live mode.
Fix: Double-check keys and ensure .env variables load correctly.
Payment Confirmation Failures
Issue: Using old Charges API instead of modern Payment Intents API.
Fix: Always use the latest API version and confirm payment on client side.
Webhook Verification Issues
Issue: Webhook signature mismatch or incorrect endpoint.
Fix:
- Verify endpoint secret in the Stripe Dashboard.
- Use official SDK functions like:
stripe.webhooks.constructEvent(payload, sig, endpointSecret)
- Always validate before processing events.
Advanced Stripe Features You Should Use In 2025
Integrating basic payments is just the beginning. In 2025, Stripe offers many advanced features that can transform your business operations.
1. Stripe Connect – Powering Marketplaces
Stripe Connect allows multi-vendor platforms to manage and distribute payments seamlessly.
For example, apps like Lyft and Shopify use Stripe Connect to handle split payments.
Use Case:
If you’re building a marketplace (e.g., connecting sellers and buyers), Connect helps route payments automatically and compliantly.
Key Benefits:
- Automated payouts to sellers
- Built-in KYC (Know Your Customer) compliance
- Real-time earnings dashboard
2. Stripe Billing – Subscriptions & Recurring Payments
Businesses that rely on subscription revenue can automate their billing with Stripe Billing.
It manages invoices, recurring payments, and failed payment retries automatically.
Example:
A SaaS platform can use this setup to charge users monthly or annually without manual input.
Pro Tip: Combine Billing + Customer Portal to let users update cards or cancel plans easily.
3. Stripe Terminal – In-Person Payments
Stripe isn’t limited to online payments — with Stripe Terminal, businesses can accept in-person card payments via hardware readers.
It’s ideal for hybrid stores that operate both online and offline.
Example:
A café using Stripe online for delivery orders can also use Stripe Terminal for counter transactions — all data syncs in one dashboard.
4. Stripe Radar – Advanced Fraud Prevention
Fraud is one of the biggest concerns in digital payments.
Stripe Radar, powered by machine learning, blocks suspicious transactions automatically.
Key Highlights:
- Detects fraud using global data patterns
- Integrates seamlessly with existing APIs
- Reduces chargebacks and false positives
According to Stripe’s 2024 report, Radar reduces fraudulent activity by up to 89% across eCommerce platforms.
5. Stripe Identity – Secure Verification
With increasing regulations like KYC and AML, businesses must verify customer identities.
Stripe Identity uses biometric verification (ID scan + selfie) to verify users in seconds.
Why It Matters:
This feature builds trust and compliance, especially for fintech, gig, and rental platforms.
Security Best Practices For Stripe Integration
Handling financial data means security is non-negotiable.
Here’s how to ensure your integration stays safe in 2025:
1. Never Store Card Details On Your Server
Use Stripe Elements or Checkout, which handle PCI compliance.
This keeps sensitive card data off your servers.
2. Use Webhook Signature Verification
Always verify Stripe webhooks to prevent spoofed notifications.
Example code (Node.js):
const event = stripe.webhooks.constructEvent(body, sig, process.env.STRIPE_WEBHOOK_SECRET);
3. Rotate API Keys Regularly
Regenerate and update keys every few months to minimize exposure risk.
4. Implement Strong Error Logging
Monitor failed transactions and webhook delivery logs using Stripe Dashboard → Developers → Logs.
5. Use HTTPS Everywhere
Ensure all your endpoints use SSL certificates for data encryption and protection.
Testing And Deployment Strategy
Testing before going live is essential for a frictionless payment experience.
1. Test Mode Verification
Stripe provides test data, API responses, and logs that mirror live mode closely.
Use dummy transactions to test both success and failure cases.
2. Validate Webhooks
Run webhooks locally with the Stripe CLI:
stripe listen --forward-to localhost:4242/webhook
This allows real-time testing without deploying.
3. Go Live Checklist
- Before switching to live mode, ensure:
- All test API keys replaced with live ones
- Webhooks verified
- Error handling in place
- SSL secured endpoints
Conclusion
By 2025, Stripe stands at the forefront of global digital payment innovation.
Its flexibility, developer-friendly APIs, and strong compliance framework make it the go-to choice for startups and enterprises alike.
Whether you’re launching an eCommerce site, SaaS platform, or marketplace — Stripe integration ensures seamless, secure, and scalable transactions.
And with features like Billing, Connect, and Radar, your business stays future-proof in the evolving fintech landscape.
“Integrate once. Scale everywhere.” – That’s the Stripe promise.
FAQs – Common Questions About Stripe Integration
Is Stripe Safe For Businesses?
Yes, Stripe is PCI DSS Level 1 certified — the highest security standard for handling card data.
Can I Use Stripe Without A Website?
Yes, you can create payment links or invoices directly through the Stripe Dashboard.
Does Stripe Support Multiple Currencies?
Absolutely! Stripe supports over 135+ currencies worldwide, ideal for global businesses.
How Do I Handle Refunds In Stripe?
Use the Refunds API or the Dashboard.
Example:
await stripe.refunds.create({ payment_intent: 'pi_12345' });
Is Stripe Integration Free?
Stripe doesn’t charge for integration — you only pay transaction fees (e.g., 2.9% + $0.30 per transaction).
Visit More: Tech Boosted